
1. Currency
Admin>Payment>Currency
Make sure you have set up your local currencies and selected your default currency.
https://www.osconcert.com/faq/content/9/49/en/what-do-we-need-to-know-about-currencies.html
2. Set up your preferred Payment Methods.
Admin>Payment
Install your Payment Modules e.g PayPal, Bank Transfer etc
Double check your settings especially 'Zone Settings'. If your locality is not in USA or Australia select World Zones as your Payment Zone.
3. Sign Up Form
Admin>Shop Settings>Advanced>Customers
Configure your own Sign Up/Registration Form for your customers to easily complete a purchase.
Try to collect as little data as possible. Because of NEW Data Protection Laws consider enabling the 'I give my consent' field.
4. Concert Details (LOADED Seat Plans)
Admin>Concert Details
Configure your SHOW names, Date and Time correctly.
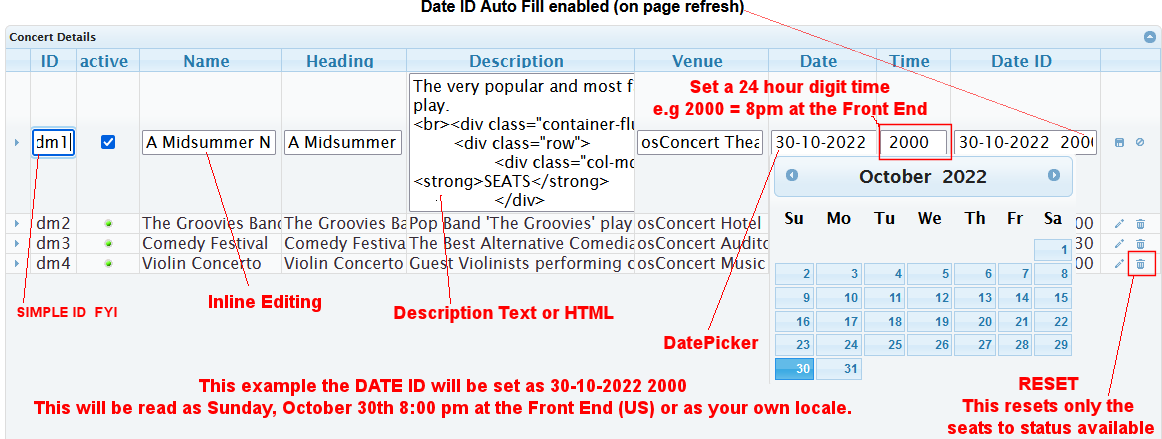
Click into the input fields for inline editing.
IMPORTANT! Set a 'unique' DATE ID, this will help for correct reporting per SHOW.
Set your prices for your 'color banding' (Left Arrow) REMEMBER to click ENTER on your computer keyboard.

5. Set your PDF eTickets
Admin>Payment>Tickets>Events Customer Ticket
This page has all the information you require to set your eTickets.
In fact to start quickly make sure you edit the 'content pane' and change all references to the osConcert default eTicket.
Admin>Shop Settings>Advanced>eTicket Settings
If you want to have your eTickets sent as an attachemnt be sure to enable here.
6. QR Scanning (preparation)
If you plan to use the QR Barcode Scanning with the Smartphone App as described here:
https://www.osconcert.com/faq/content/8/10/en/how-can-we-scan-etickets-using-a-smartphone-app.html
Be sure to set the Admin>Concert Details>Date and Time correctly as written in the document.
IMPORTANT: Enable barcode scanning data in Admin>Shop Settings>Advanced>eTicket Settings
Use Barcode Scanning=yes
7. Featured Categories/Events
Without the LEFT COLUMN MENU (Full Page Template). We will rely on the Featured Events to appear as a 'responsive' list of Events. These can be enabled as Images or Buttons. Enabled in Admin>Marketing>Options>Show Featured Categories=true
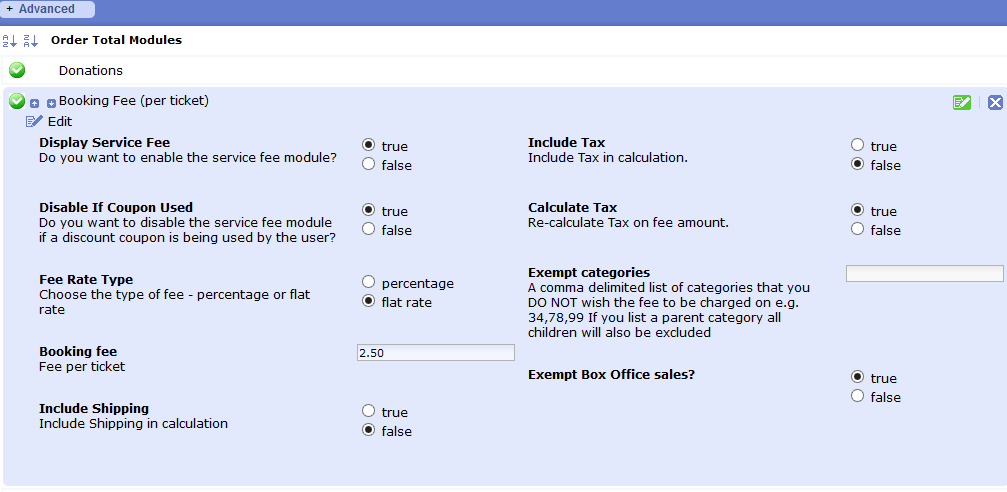
8. Order Totals
If you want to enable Booking Fee, Global Quantity Discount, Donations or Booking Fee per Ticket.
Goto Admin>Payment>Advanced>Order Totals and enable your preferred modules here.
Likewise if you plan to have Shipping/Delivery , Coupon Codes, Season Tickets remember to set the Order Total modules here too.
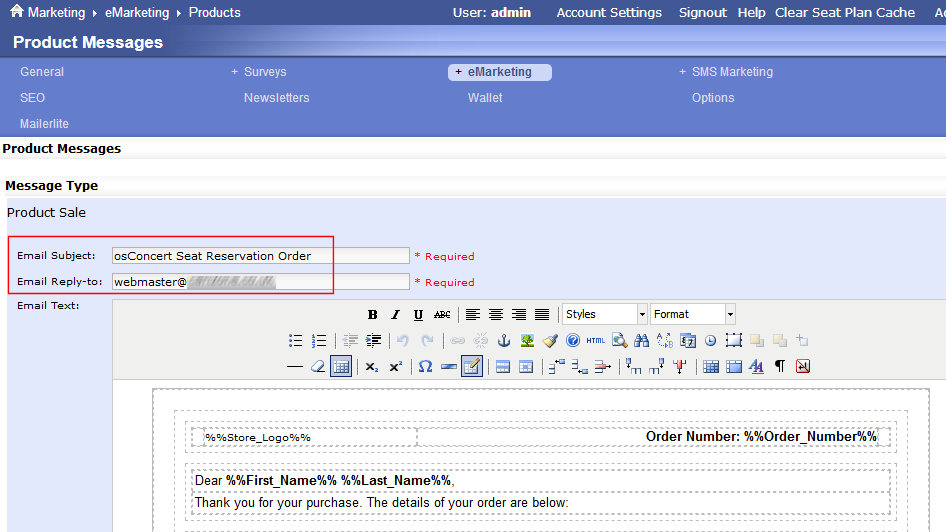
9. Email Templates
You most likely will want to customise the Email Templates as seen in Admin>Marketing.
The most important template is the Email Receipt at Admin>Marketing>Email Template
Be sure to set your own Email Subject Lines and Email Address reply-to fields for each and every template.
10. There are many more features such as Tax, Salemaker Discount and Content Managemet Systemj (CMS)
Look for the FAQ articles. There are also many tutorial documents in your /docs/ directory.
If there is something you dop not understand or that you cannot find email me in the first instance. My initial support is fast and free gordon@osconcert.com
Finally when you have made TEST orders and everything seems ready to go live you can enable Seat Plan Caching for a better performance.
You can read about that here: https://www.osconcert.com/faq/content/4/12/en/what-is-the-seat-plan-cache.html